

At its core, the Zoho CRM API is simply the bridge that allows your other business applications to talk directly to your CRM. Think of it as a universal translator, letting different software systems share information and automate tasks without needing manual intervention. This moves your CRM from being just a database to the active, beating heart of your operations.
Why the Zoho CRM API Is a Game Changer for Your Business

Let's get practical. The API isn't just about connecting systems; it's a strategic tool for growth. It's how you unlock the true power of your customer data, turning Zoho into the central hub for everything your business does.
Instead of your team wasting time exporting contacts or manually updating sales figures between different platforms, the API handles it all in the background. This simple shift drastically cuts down on human error, frees up countless hours, and guarantees your data is consistent across every tool you use. Don't think of it as intimidating code, but rather as a set of clear instructions that get your software working together as a cohesive team.
Centralize Data and Automate Workflows
The real magic happens when you use the API to connect previously siloed systems. By integrating Zoho CRM with your other essential tools—like a cloud contact center, your accounting software, or marketing platforms—you create a single, reliable source of truth for every customer interaction.
This unified approach delivers some serious advantages:
- A Complete Customer Picture: Your sales and support teams can see a customer's entire journey—from their first website visit to the most recent support ticket—all in one place.
- Serious Efficiency Gains: Automating routine tasks, like creating a new lead from a web form or logging call details, lets your team focus on high-value work like building relationships and closing deals.
- Rock-Solid Data Accuracy: When systems update each other automatically, you virtually eliminate the risk of duplicate records and outdated information.
This kind of integration is non-negotiable for a modern business. To really grasp what the API can do, it helps to understand the power of the underlying Zoho CRM platform itself. Its inherent flexibility is a huge part of why it's so widely adopted.
For instance, by connecting your telephony system to Zoho CRM via its API, you can automatically log every single call, trigger screen pops with caller details, and arm your agents with the context they need to deliver standout service every time.
A Foundation for Scalable Growth
The numbers speak for themselves. Zoho CRM is trusted by over 250,000 businesses around the globe, and its global revenue recently hit $1.4 billion after a 27% year-over-year jump. It's particularly popular with SMEs in the UAE who need powerful SaaS solutions that are both budget-friendly and quick to get up and running.
In this guide, we'll walk through exactly how to put the Zoho CRM API to work, taking you from the initial setup and authentication right through to managing data and building a real-world integration.
Getting Your Zoho Environment Ready for API Access
Before you can fire off your first zoho crm api call, you’ve got to get your environment set up correctly. This isn’t just a formality; it’s about making sure your application can talk securely to Zoho’s servers with the right permissions. Think of it as getting the keys and the security clearance before you try to walk into a secure building.
Everything starts in the Zoho API Console. This is your command center for any application you want to connect to the API. Your first move is to register a new client—this is how you officially introduce your app to Zoho so it can be identified and authenticated down the line.
Registering Your Client Application
When you go to register your app, Zoho will ask you to pick a client type. This is a crucial choice because it determines the exact authentication method your application will use. The two you’ll see most often are Server-based Applications and Self-Client.
- Server-based Applications: This is the go-to for most professional integrations. If you're connecting a web app or a back-end service like our contact center platform, this is the one you want. It uses the full OAuth 2.0 flow, which is perfect for systems that need to run in the background without a user constantly present.
- Self-Client: This option is built for smaller, one-off scripts or personal tools where you're the only user. It simplifies things by giving you a temporary code that you manually turn into access and refresh tokens—great for quick tests or personal projects.
For a reliable, long-term connection like a telephony system, the server-based option is the only way to go. It’s what we use for integrating with Cloud Move’s solutions. Once you select it, you'll need to fill in some details like your app's name and, most importantly, a Redirect URI. This is the URL where Zoho will send the user right after they approve your app.
The Redirect URI is a non-negotiable security checkpoint. It has to be a valid, HTTPS-secured URL under your control. Zoho will only ever send authentication codes to this exact address, which helps prevent them from being intercepted.
Once you’ve successfully registered the client, Zoho gives you two critical pieces of information: a Client ID and a Client Secret. Guard these like you would a username and password. They need to be stored securely on your server and should never, ever be exposed in front-end code like JavaScript.
The Zoho developer docs have a great visual of the API console where all this happens.
This is the dashboard where you can manage your client details, regenerate a secret if it’s ever compromised, and tweak other settings for your connected apps.
Defining Your API Scopes
Just having a Client ID and Secret doesn't give you a free pass. You also have to explicitly declare what your application is allowed to do. This is handled through scopes. A scope is simply a specific permission that grants your app access to a certain part of the Zoho CRM API.
This is a core security practice. Instead of asking for the keys to the entire kingdom, you only request permissions for what your app absolutely needs to function. It’s the principle of least privilege in action. For example, if your integration just needs to read and write contact records, there’s no reason to request permission to delete accounts.
Some of the common scopes you'll likely run into are:
ZohoCRM.modules.all: Gives you access across all the main CRM modules (Leads, Contacts, Accounts, etc.).ZohoCRM.settings.all: Grants permissions to access settings within the CRM.ZohoCRM.users.READ: Lets your application read user data.
For an integration that needs to log call details, like we cover in our guide to Zoho CRM telephony integration, you’d probably need scopes that allow reading and writing to the Contacts, Leads, and Activities modules. Taking the time to select these scopes carefully at the beginning builds a secure and predictable foundation, ensuring your app only operates within the boundaries you’ve set.
Getting Through Zoho's OAuth 2.0 Authentication
If you’re going to hit a snag integrating with the Zoho CRM API, authentication is often the first real hurdle. The process can look a bit intimidating, but at its core, Zoho’s use of OAuth 2.0 is a rock-solid, standard way for your app to get permission to access CRM data without ever seeing a user’s password. Let's pull this process apart and see how it really works.
Think of it as a carefully choreographed handshake between your application and Zoho's servers. Your app asks for permission, the user says "yes," and Zoho hands over a set of temporary keys. These keys—or tokens, as they're called—are what you'll use to make authenticated requests from that point forward.
This flow is the foundation for everything that comes next.
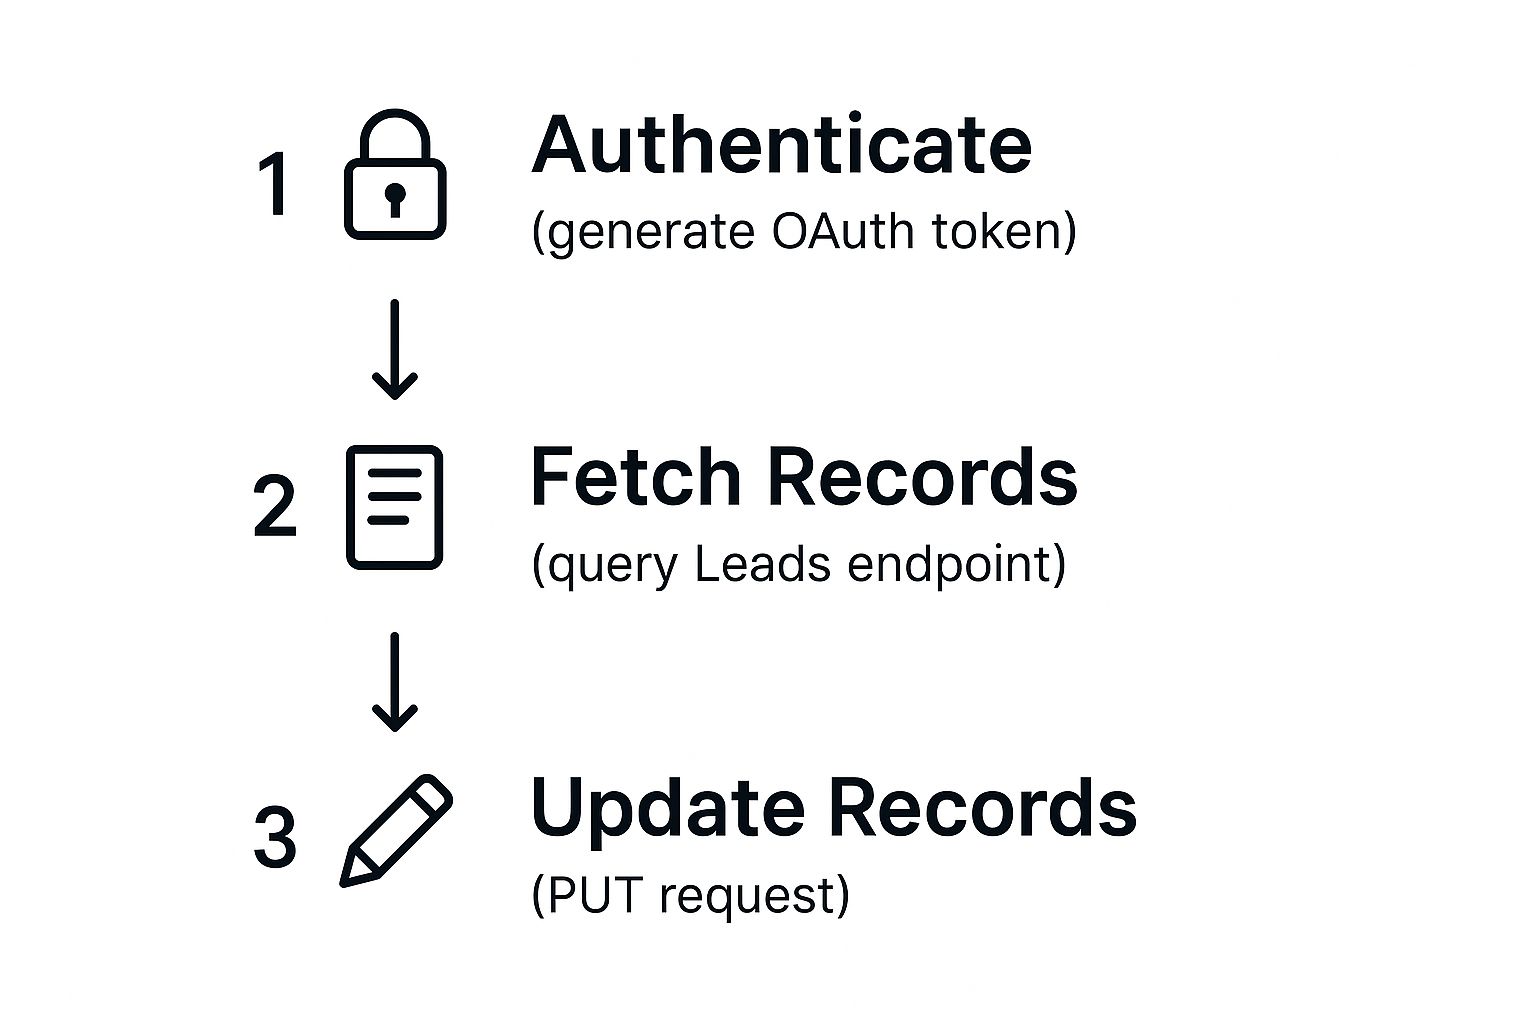
As the diagram shows, that OAuth token is your golden ticket. It's the critical first step that opens the door to reading from and writing to records inside the CRM.
Kicking Off the Authorization Request
The whole process starts when you send the user to Zoho's authorization endpoint. This isn't just a simple link; you have to build a URL with specific parameters that tell Zoho who your application is and what it wants to do.
A typical authorization URL will be packed with a few key pieces of information:
response_type=code: This signals that you're starting the standard authorization code flow.client_id: Your app's unique identifier, which you get when you register it with Zoho.scope: This defines the permissions your app needs, likeZohoCRM.modules.READorZohoCRM.modules.ALL.redirect_uri: The callback URL where Zoho will send the user back after they approve. This has to match what you set up in your app's registration.access_type=offline: Don't forget this one. It's what tells Zoho to give you a refresh token, which is absolutely essential for maintaining access over the long haul.
When a user follows this link, they land on a Zoho consent screen. It clearly lists your app's name and the permissions it's asking for. Once they click 'Accept,' Zoho sends them back to your redirect_uri with a temporary authorization code tacked onto the end of the URL.
Heads up: that authorization code is a one-time-use deal and it expires fast—usually within a few minutes. Your application needs to be ready to grab it and trade it for an access token right away.
Swapping the Code for Your Tokens
With the temporary code in hand, the action moves to your server, completely behind the scenes. Your next move is to send a POST request directly to Zoho's token endpoint (https://accounts.zoho.com/oauth/v2/token).
This server-to-server call needs to include:
- Your Client ID and Client Secret.
- The same Redirect URI you used in the first step.
- The short-lived authorization code you just received.
- A
grant_typeparameter with the valueauthorization_code.
If you’ve sent everything correctly, Zoho’s server will respond with a JSON object. This is the payoff. Inside, you'll find the keys to the kingdom: the access token and the all-important refresh token.
Understanding Your New Tokens: Access vs. Refresh
It’s crucial to get the difference between the two tokens you just received. They have very different jobs and lifespans, and mixing them up is a classic mistake I’ve seen trip up many developers.
Here’s a quick overview of the different tokens involved in Zoho's OAuth 2.0 flow.
Zoho API Authentication Token Types
| Token Type | Purpose | Default Lifespan | Management Strategy |
|---|---|---|---|
| Access Token | Authorizes your actual API requests. You'll pass this in the Authorization header of every call. |
1 Hour | Use it for all your API calls until it expires. Store it securely but temporarily (e.g., in cache). |
| Refresh Token | Used only to get a new access token when the old one expires. It keeps the connection alive. | Long-lived | This is your key to persistent access. Store it securely and permanently in your database. |
The access token is your short-term pass. For the next hour, you’ll include it in the header of every API call you make—whether you're fetching leads or updating a contact record. The header looks like this: Authorization: Zoho-oauthtoken 1000.xxxx.xxxx.
Properly managing these tokens is the difference between a reliable integration and one that constantly needs user intervention.
How to Maintain Long-Term Access with the Refresh Token
That one-hour lifespan on the access token means your application has to be built to handle expirations gracefully. This is where the refresh token proves its worth. Instead of bugging the user to log in and authorize your app all over again, you can use the refresh token to get a new access token silently in the background.
To do this, you make another POST request to that same token endpoint. The payload is slightly different this time:
grant_type: Set this torefresh_token.client_id: Your application's client ID.client_secret: Your application's client secret.refresh_token: The refresh token you carefully stored earlier.
In return, Zoho provides a fresh access token that's good for another hour. It's a simple, repeatable cycle: use an access token, and when it expires, use your refresh token to get a new one. Mastering this flow is the secret to building any Zoho CRM integration that needs to run reliably for days, weeks, or even years.
Getting Your Hands Dirty with Core API Operations

Once you've got a valid access token, the real work begins. This is where you actually start managing the data inside your CRM. We'll be focusing on the four fundamental actions that are the foundation of almost any integration with the Zoho CRM API.
You'll often hear these referred to as CRUD operations:
- Create: Adding new records, like a fresh lead from your website.
- Read: Fetching existing data, such as a contact's phone number.
- Update: Modifying records, for instance, changing an account's address.
- Delete: Removing outdated or incorrect information.
Getting comfortable with these four operations is key to building powerful workflows that keep your CRM perfectly in sync with other business tools. Each one maps to a standard HTTP method and API endpoint, so once you learn the pattern, it becomes second nature.
Creating a New Record
Let's walk through a classic scenario: a potential customer fills out the "Contact Us" form on your website, and you need to add them to Zoho as a new lead. To make this happen, you'll send a POST request to the correct module endpoint.
The URL structure is clean and predictable:https://www.zohoapis.com/crm/v2/{module_api_name}
In our case, the {module_api_name} is simply Leads. The body of your POST request needs to be a JSON object containing a data key, which holds an array of the record or records you're creating.
Each record object in that array is made up of key-value pairs that match the Zoho CRM fields you want to fill. A common mistake is to use the display label (like "Last Name") instead of the correct API name (Last_Name). Always double-check your field names.
Here’s a pro tip from the trenches: always include a
triggerarray in your payload. By adding"workflow","approval", and"blueprint", you guarantee that any automation you've built in Zoho will fire when the new record is created. This keeps your data consistent and enforces your business rules without any extra work.
Reading Existing Records
Pulling data out of the CRM is just as important as putting it in. Imagine your contact center gets a call. You need to instantly display the caller's entire history. That's a job for a GET request.
You can fetch a whole list of records from a module like this:https://www.zohoapis.com/crm/v2/Contacts
Or, you can zero in on a specific record using its unique ID:https://www.zohoapis.com/crm/v2/Contacts/{record_id}
A successful GET request will return a JSON response with a data array containing the records you asked for. The API is also smart enough to accept query parameters that let you filter, sort, and specify which fields you want back. This is a great way to minimize the amount of data you're transferring and keep your integration snappy.
Updating an Existing Record
Your business data is always in motion. Contacts change jobs, deals move to the next stage, and information needs to be kept current. The Zoho CRM API handles this with a standard PUT request.
The endpoint for an update is targeted to a specific record via its ID:https://www.zohoapis.com/crm/v2/Accounts/{record_id}
Just like with creating a record, the request body needs a JSON object with a data array. The crucial difference is that you only need to include the fields you want to change. There's no need to send the entire record back—just the key-value pairs for the updated information.
This approach is not only efficient but also helps prevent you from accidentally overwriting good data. For building integrations that last, it's always a good idea to ground your work in established API design best practices.
Deleting a Record
Finally, let's talk about deletion. While you might not use this as often in automated flows, it's a critical tool for keeping your data clean. This operation uses the DELETE method and, much like an update, targets a record by its unique ID.
https://www.zohoapis.com/crm/v2/Leads/{record_id}
A successful DELETE request permanently removes that record from Zoho CRM. Because this action can't be undone through the API, it's incredibly important to build safeguards into your application. Many developers I know prefer to update a record's status to something like "Inactive" rather than deleting it outright, which gives them a safety net.
These core operations are incredibly powerful, but Zoho is constantly layering more intelligence on top. They continue to embed AI-driven tools like Zia Agents—smart, task-specific assistants that automate workflows for sales and support teams. This strategy of integrating AI directly into the CRM aligns perfectly with the UAE's focus on digital transformation. The data you're managing with these API calls today could be fueling some seriously sophisticated automations tomorrow.
Weaving Your Contact Center into Zoho CRM
Alright, let's get practical. Theory is one thing, but the real power of the Zoho CRM API comes to life when you use it to solve a real-world business problem. One of the most impactful projects you can tackle is integrating Zoho CRM with a cloud contact center platform. This isn't just about connecting two systems; it's about fundamentally changing how your sales and support teams operate.
Think about the typical setup. Your agents have a phone system on one screen and Zoho CRM on another. When a call comes in, they're scrambling to find the customer's record, and after the call, they're stuck with the tedious task of manually logging notes. It's inefficient, clunky, and a breeding ground for human error.
By tapping into the API, we can build a bridge between these two worlds, creating a single, intelligent workspace where call events drive CRM actions automatically.
Nail Down Your Call Logging—Automatically
The first win is to take call logging off your agents' plates entirely. Every single time a phone call comes through your contact center, the system should instantly talk to Zoho CRM to create a perfect record of the interaction.
Here’s how that dance typically plays out using the API:
- Find the Caller: Your contact center grabs the incoming phone number and sends a
GETrequest to the API, asking, "Who is this?" It checks theContactsandLeadsmodules for a match. - Log the Call: If it finds a match, the system immediately makes a
POSTrequest to create a new task or a record in a customCallsmodule, automatically linking it to the right person. - Capture New Leads: What if the caller is a new prospect? No problem. You can configure the system to create a brand-new lead record automatically, so no opportunity ever slips through the cracks.
With this in place, every interaction is captured in real-time. You get a complete, accurate history of customer communication without anyone lifting a finger to do data entry.
Picture this: An agent just wrapped up a tricky support call. Instead of spending the next five minutes typing notes, the API has already created a record with the caller’s name, call duration, and even a link to the recording. The agent is free to help the next customer immediately.
The Magic of the Instant Screen Pop
While automatic logging cleans up your data, the "screen pop" is the feature that will make your agents' jaws drop. It's all about giving them the right information at the exact moment they need it.
The whole process is lightning-fast:
- A call comes into the contact center.
- The platform identifies the caller's phone number.
- It fires off a
GETrequest to the Zoho CRM API, searching for that number in theContactsmodule. - The API sends back the matching contact's data.
- Pop! The caller's complete CRM profile appears on the agent's screen before the phone even finishes its second ring.
The agent can now greet the customer by name with full context—their purchase history, open tickets, and recent conversations are all right there. This turns a generic, reactive phone call into a personalized, proactive conversation. Building this kind of seamless workflow is a key part of a modern omnichannel contact center strategy.
Ultimately, when you combine automated logging with instant screen pops, you’re doing more than just connecting software. You're creating a smarter, more efficient workflow that eliminates busywork, cuts down on call handling times, and gives your team the insights they need to deliver truly exceptional service.
Common Questions About the Zoho CRM API

As you start working with the Zoho CRM API, you’ll inevitably run into a few common questions and roadblocks. Getting ahead of these early on will save you a ton of time and frustration down the road. Let's walk through some of the most frequent hurdles developers face when they first dive in.
Getting a handle on these details is the key to building a solid, efficient integration. From managing your API credits to dealing with custom data structures, a little bit of foresight makes all the difference.
How Should I Handle API Rate Limits?
Zoho CRM uses a credit-based system to keep its API usage fair and stable for everyone. It’s not just about how many calls you make; it’s also about how complex they are. For example, a typical Enterprise edition account gets 250,000 credits for the whole organization every 24 hours.
The only way to stay on top of this is to check the API response headers on every call. Keep an eye out for these two values:
X-RATELIMIT-LIMIT: This tells you your total credit allowance for the current 24-hour window.X-RATELIMIT-REMAINING: This is the important one—it shows how many credits you have left to use.
If you burn through your credits, you'll start seeing a 429 Too Many Requests error. The best approach is to build your application to handle this gracefully. Think about adding an exponential backoff mechanism to pause and retry, or maybe create a queue for less critical requests. Managing these limits is just as crucial as tracking your https://cloud-call-center.ae/2025/08/21/kpis-for-call-centers/ to measure operational health.
Can I Work with Custom Modules and Fields?
Of course. One of the best things about the Zoho CRM API is that it’s built to work with any customizations you’ve made. This applies to entirely new custom modules you've built and any custom fields added to standard modules like Contacts or Accounts.
The trick is to always use the correct API name, not the display label you see in the CRM's user interface. You can track these down easily by heading to Setup > Developer Space > APIs > API Names.
When you’re sending a POST or PUT request, you just need to include the custom field's API name in your JSON payload, the same way you would for a standard field. This flexibility is what allows you to build an integration that perfectly matches your company’s unique data needs.
What Is the Best Way to Test My Integration?
The number one rule of testing any API integration: never, ever use your live production data. It's a recipe for disaster. Luckily, Zoho gives you the perfect tool for the job: a Sandbox environment.
A Sandbox is a safe, isolated copy of your production environment. It’s a playground where you can develop, test, and debug your API integration without any risk of messing up your actual customer data.
Using a Sandbox means you can go wild. Perform all the CRUD operations you want, test your authentication flows, and trigger webhooks without a second thought. This is where you push your integration to its limits, find the bugs, and polish your code. Once you're completely confident that everything works as expected in the Sandbox, then—and only then—should you switch over to your production credentials and go live.