

Generating an SSL certificate isn't just a technical task; it's a fundamental step in securing your corner of the internet. The process usually starts by creating a Certificate Signing Request (CSR) that contains your domain details. You then send this off to a Certificate Authority (CA) to get it validated and signed.
For development or internal testing, you can skip the CA for a bit and whip up a self-signed certificate in moments using a tool like OpenSSL. This gets you up and running with encryption right away, though it's not meant for public-facing sites.
What You Need to Know Before Generating an SSL Certificate

Before diving into the command line, it's crucial to get a handle on what these certificates actually do. An SSL (Secure Sockets Layer) certificate is what enables the encrypted connection between a visitor's browser and your web server. Without it, any data exchanged—like login credentials or payment info—is sent in plain text, which is a major security risk.
Think of it as your website's digital passport. It verifies your identity and assures visitors that the connection is secure, which is why browsers show that familiar padlock icon. The underlying technology, TLS (Transport Layer Security), has since replaced SSL but the name has stuck. This same principle of secure communication is also essential for other protocols, such as when you're setting up voice calls over https://cloud-call-center.ae/2025/07/04/sip-tls/.
Choosing the Right Level of Trust
SSL certificates aren't a one-size-fits-all solution. They come in different tiers based on the level of background checking, or validation, that the Certificate Authority performs. The one you choose really depends on what you're building.
- Domain Validated (DV): This is the most common and basic type. The CA only confirms that you own and control the domain. It’s perfect for blogs, portfolios, or personal sites where you just need basic encryption. They're usually issued in minutes.
- Organization Validated (OV): This one goes a step further. The CA verifies your organization's details, adding a layer of trust. It's a solid choice for business websites that need to show they are a legitimate entity but don't handle highly sensitive data like financial transactions.
- Extended Validation (EV): This is the gold standard of SSL certificates. It involves a deep, thorough vetting of your organization by the CA. EV certificates are designed for e-commerce stores, banks, and any site handling sensitive information where building maximum user trust is paramount.
To help you decide, here’s a quick breakdown of the different types of certificates.
Choosing the Right SSL Certificate for Your Needs
| Certificate Type | Validation Level | Best For | Issuance Time |
|---|---|---|---|
| Domain Validated (DV) | Basic | Blogs, personal sites, portfolios | Minutes |
| Organization Validated (OV) | Medium | Business websites, informational portals | 1-3 business days |
| Extended Validation (EV) | High | E-commerce, banking, government sites | 1-5 business days |
This table should give you a clearer picture of which certificate aligns with your project's security needs and goals.
The push for better web security is a global trend. For instance, the Middle East & Africa region has seen SSL adoption jump by 15% to 25% annually in recent years, a clear sign that secure digital services are becoming standard practice everywhere. Understanding these certificates is a core part of modern enterprise software security strategies.
Generating a Self-Signed Certificate with OpenSSL
Sometimes you don't need a publicly trusted certificate. For internal tools, development servers, or just testing things out, a self-signed certificate is the perfect solution. It gives you all the encryption benefits of a CA-signed cert without the cost or validation hassle. With a tool like OpenSSL, you can whip one up in a minute.
Think of it like being your own mini Certificate Authority. You create and sign the certificate yourself, which is ideal for securing an internal dashboard or a staging environment. Just remember, browsers will throw up a big warning sign for these because they aren't signed by a recognized CA, so they're a definite no-go for any public website.
Creating Your Private Key and Certificate
It all starts with generating a private key and then using it to sign your new certificate. The beauty of OpenSSL is you can knock this all out with one command. It’ll ask you a few questions to build the certificate's identity—things like your country, organization, and most importantly, the Common Name.
Pro Tip: This is where a lot of people trip up. When OpenSSL asks for the "Common Name (e.g. server FQDN or YOUR name)," you absolutely have to enter the exact domain or server address you're securing. If it's for local development,
localhostis usually what you want. Mismatching this name is a classic cause of browser trust errors down the line.
Here’s the command that does all the heavy lifting. It creates the key and the certificate in one go.
openssl req -x509 -newkey rsa:2048 -keyout private-key.pem -out certificate.pem -days 365 -nodes
So, what’s actually happening here? Let's break down those flags:
- -x509: This tells OpenSSL you're making a self-signed certificate.
- -newkey rsa:2048: This generates a brand new 2048-bit RSA private key.
- -keyout private-key.pem: This is the filename for your new private key.
- -out certificate.pem: And this is the filename for the certificate itself.
- -days 365: Sets the certificate to be valid for one year.
- -nodes: This is short for "no DES." It means the private key won't be protected with a password, which is often fine for development.
This quick, self-contained process is the polar opposite of getting a public certificate, which always involves a back-and-forth with a Certificate Authority for validation.
The flow for getting a CA-signed certificate, as shown below, involves several external steps that our self-signed approach completely bypasses.
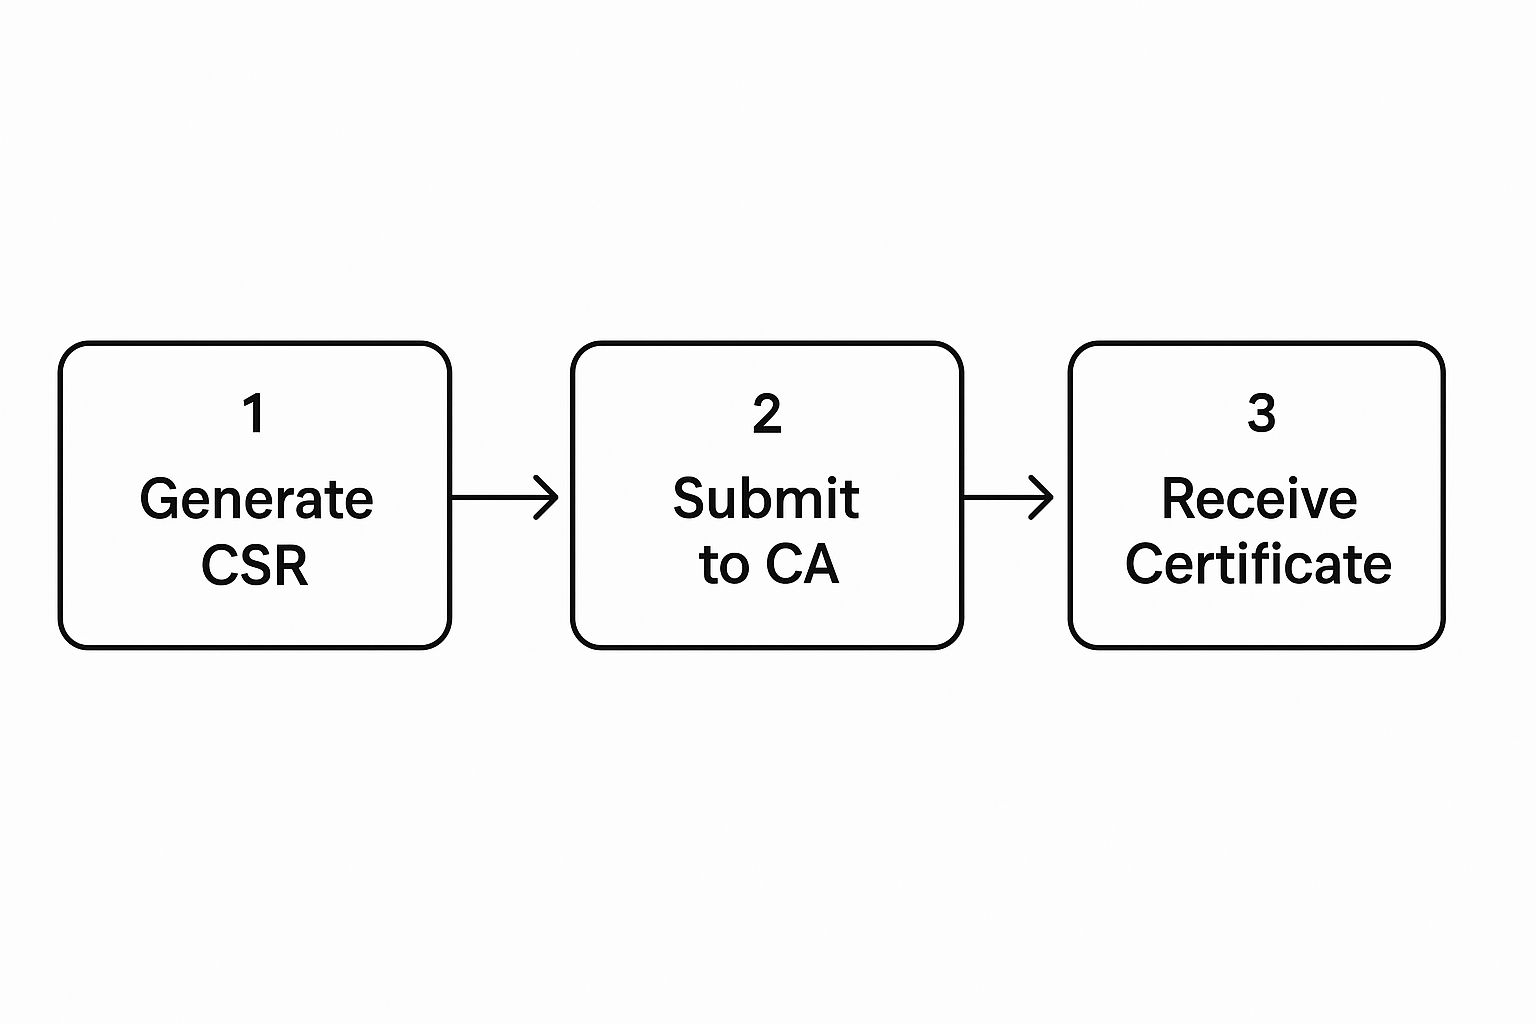
As you can see, getting a public cert means proving your identity to an outside party. With the OpenSSL command, you handle everything on your own machine instantly.
Creating a Certificate Signing Request for a CA

When you're ready to take your site public, a self-signed certificate just won’t do. To avoid those dreaded browser warnings and build trust with your visitors, you’ll need a certificate from a recognized Certificate Authority (CA). This whole process kicks off with generating a Certificate Signing Request (CSR).
Think of a CSR as your formal application to the CA. It packages up all the key details about your domain and organization that the CA needs to verify who you are before they’ll issue your SSL certificate. Getting this application right from the start is absolutely crucial.
Generating Your CSR with OpenSSL
The most common way to do this is with a single OpenSSL command, which creates both your CSR and a brand new private key at the same time. As you run the command, the tool will prompt you to enter specific details about your organization.
Pay close attention here. Any errors or mismatches between the information you provide and your actual company records can cause the validation to fail, which can seriously delay getting your certificate.
Here’s the command you'll use:
openssl req -new -newkey rsa:2048 -nodes -keyout yourdomain.key -out yourdomain.csr
Once you run that, OpenSSL will ask you for a few key pieces of information:
- Country Name (2 letter code): The two-letter code for your country (e.g., US, GB).
- State or Province Name: The full name of your state or province.
- Locality Name: Your city.
- Organization Name: Your full, legally registered company name.
- Organizational Unit Name: The department handling the certificate, like "IT Department."
- Common Name (CN): This is the most important field. You must enter the exact fully qualified domain name (FQDN) you need to secure, like
www.yourwebsite.com.
Key Takeaway: The Common Name has to be a perfect match for the domain you're securing. A mismatch here is one of the most common—and avoidable—mistakes that will cause browsers to reject the certificate.
The need for this kind of security is growing fast. In the UAE, for example, the number of issued SSL certificates has climbed significantly since 2018. Some industry sources have even reported annual growth over 20% in generation requests, which makes sense with the explosion of e-commerce. You can dig into more of this data in this market report.
This same principle of verified identity is critical in other areas, too, like when you need to secure a Microsoft Teams Session Border Controller. After you’ve finished the process, you'll have two new files: yourdomain.key (your private key) and yourdomain.csr (the file you'll send to the CA).
Automating SSL Certificates with Let's Encrypt and Certbot
Going through the motions of creating a CSR, sending it to a CA, and installing the certificate gets the job done. But this manual process has a serious Achilles' heel: renewal. We've all seen it happen—someone forgets to renew a certificate, and suddenly a website is down, bleeding visitor trust and revenue. This is exactly where automation changes everything.
The modern way to handle SSL is by using Let's Encrypt, a free and automated Certificate Authority, along with its sidekick software, Certbot. Together, they completely take the manual labor out of issuing and renewing certificates.
How Certbot Streamlines the Process
Imagine Certbot as your dedicated SSL assistant living on your server. Once you install it on your web server—whether it’s Apache, Nginx, or something else—it takes over the entire certificate lifecycle. It automatically proves you own the domain, pulls the certificate from Let's Encrypt, and even tweaks your server configuration to start using it.
The real magic, though, is its "set it and forget it" capability. Certbot quietly sets up a scheduled task in the background to renew your certificates long before they expire. This simple step ensures your site stays secure without you ever having to think about it again, completely avoiding that dreaded "Your connection is not private" error that sends visitors running.
For projects where downtime is simply not an option—think e-commerce stores, client portals, or any site with steady traffic—automating your SSL certificate isn't just a nice-to-have; it's a core requirement. The risk of human error in manual renewals is just too high to ignore.
This automated approach is perfect for the vast majority of public websites. For instance, if you're running a standard WordPress blog on an Apache server, a single Certbot command can secure your entire site in a matter of minutes.
Here’s a look at what Certbot handles for you:
- Installation: You start by installing the Certbot client that's tailored for your specific operating system and web server.
- Execution: You run a simple command, telling Certbot which domains you want to secure.
- Validation: Certbot then automatically proves to Let's Encrypt that you control the domain, usually by placing a temporary file in a specific spot on your server.
- Configuration: Once validated, it fetches the certificate, configures your server to use it, and even sets up redirects to push all HTTP traffic to secure HTTPS.
By automating your SSL certificate renewals, you get back valuable time and, more importantly, eliminate a major point of failure in your website's security.
Best Practices for Managing Your SSL Certificates

Getting an SSL certificate up and running is a great start, but it’s really just the beginning. The real work is in managing the certificate's entire lifecycle. This ongoing process is what truly protects your website’s integrity and keeps visitor trust intact for the long haul.
The cornerstone of good management is keeping your private key safe. Think of this file as the master key to your server's identity. If it falls into the wrong hands, an attacker could impersonate your site, and that's a disaster you want to avoid. You need to store it in a highly secure location with tightly restricted access, just like you would with any other piece of critical infrastructure.
This level of security is non-negotiable, especially in sectors like healthcare where data sensitivity is at its peak. Our guide on https://cloud-call-center.ae/2025/06/19/hipaa-compliant-cloud-solutions/ dives deeper into these kinds of security principles.
Monitoring and Renewals
An expired certificate is one of the most common—and easily avoidable—gaffes in website management. When a certificate expires, visitors are hit with glaring browser warnings that kill trust and send traffic running for the hills. A solid monitoring and renewal plan is your best defense.
Here's a simple framework that works:
- Calendar is Your Friend: Don't just set one reminder. Set several, starting well before the expiration date.
- Leverage Monitoring Tools: There are plenty of services out there that can track expiration dates and ping you with alerts automatically.
- Automate Where Possible: If your setup allows for it, tools like Certbot can handle renewals for you. It’s a true "set-it-and-forget-it" solution.
Automation has become a game-changer for certificate management, and for good reason. In a market like the UAE, where an estimated 70% to 85% of major websites use SSL, automation is the key to preventing outages and security lapses.
Finally, always have a plan for revoking a certificate. If you even suspect a key has been compromised, you need to act fast. Following essential network security best practices is fundamental to both managing SSL certificates effectively and safeguarding your overall data environment.
Frequently Asked Questions About SSL Certificates
When you're first diving into generating SSL certificates, a few questions tend to come up again and again. Getting these cleared up early can save you a lot of headaches down the road.
Self-Signed vs. CA-Signed: What's the Real Difference?
This is probably the most common point of confusion. A self-signed certificate is one you create and sign yourself. It’s a fantastic option for development environments or internal-only tools because it’s free and you can generate one instantly. The big catch? Browsers don't trust it, so visitors will get a scary security warning.
A CA-signed certificate, on the other hand, is issued by a trusted Certificate Authority (CA). The CA verifies you are who you say you are, and in return, browsers give your site the green padlock. For any public-facing website, this is non-negotiable.
How Long Does It Actually Take to Get a Certificate?
This really depends on how much verification you need. The timeline can vary quite a bit.
- A Domain Validated (DV) certificate is the fastest. Since it only confirms domain ownership, you can often have it in hand within minutes.
- Organisation Validated (OV) and Extended Validation (EV) certificates are a different story. They involve manual checks of your business registration and can take a few days to process.
Can One Certificate Cover Multiple Websites?
Yes, absolutely. You don't always need a separate certificate for every single domain or subdomain. A Multi-Domain (SAN) certificate is perfect for securing several different domain names under one roof. Think yourcompany.com, your-other-company.net, and brand-new-product.io all on a single certificate.
Then there's the Wildcard certificate. This is your go-to for securing a primary domain and all its direct subdomains (like blog.yourdomain.com, shop.yourdomain.com, etc.). It's a huge time-saver.
What happens if my certificate expires? Your visitors will be greeted with a prominent security warning, telling them the site is not secure. This erodes trust in an instant, sends bounce rates soaring, and can even harm your search rankings. It’s exactly why so many people rely on automated renewals.
At Cloud Move, we understand that secure, reliable communication is the bedrock of business. Our enterprise telephony and cloud contact centre solutions are built with security at their core, ensuring every customer interaction is protected. To see how we can unify your communications with robust, compliant technology, visit us at https://cloud-call-center.ae.